
Caching in JBoss Data Virtualization
We have been setting up models and have been doing querying directly or via federated queries to the undrelying datasources, we will now look at how we can do security in JDV.
Where are we?
Prerequisites
-
Sample Teiid project
-
One or more source models created
-
One or more view models created and the views (virtual tables)
-
A Virtual Database (VDB) created that exposes one or more virtual models
Data Roles
Straight from the documentation :
"Data roles, also called entitlements, are sets of permissions defined per VDB that dictate data access (create, read, update, delete). Data roles use a fine-grained permission system that JBoss Data Virtualization will enforce at runtime and provide audit log entries for access violations."
Before applying RBAC, note/consider the following:
-
A VDB deployed without any defined data roles is open for access to any authenticated user
-
Restrict source system access by modeling the VDB such that
-
Imported metadata is narrowed to what will be used (directly or indirectly) by the view models
-
At a more granular level, source table columns that will not be used or required are removed or the source table marked as non-updatable
Defining Data Roles in a VDB
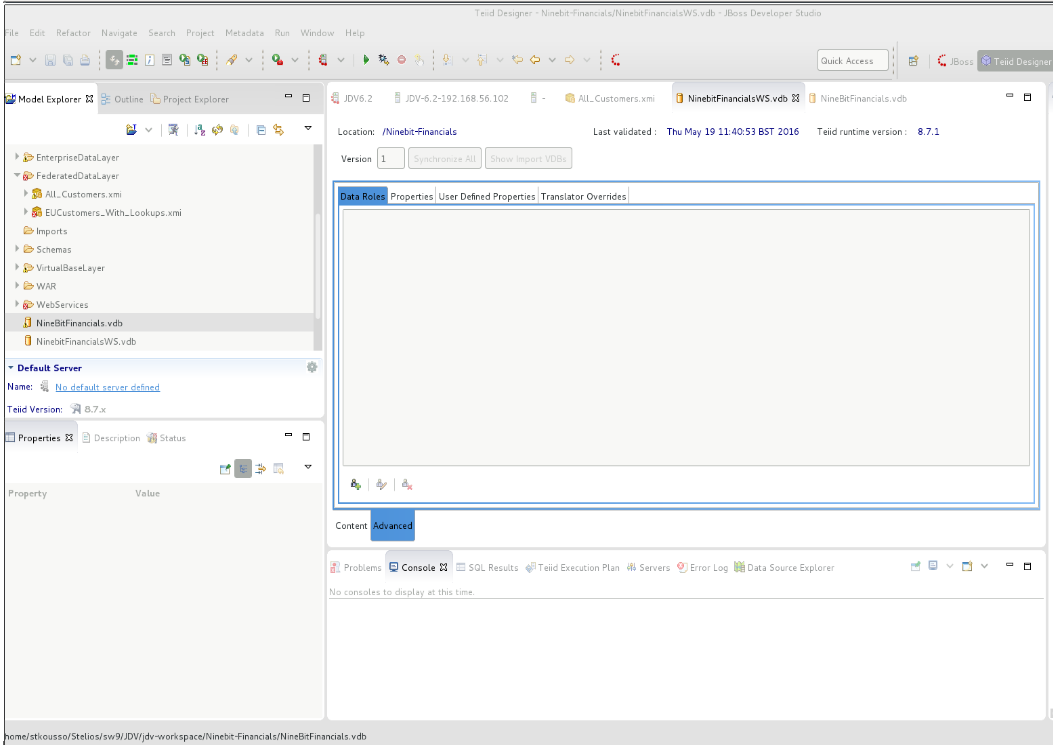
Double-click on the VDB that is created in your JBoss Data Virtualization (Teiid) Model Project. Notice the two tabs: Content and Advanced at the bottom of the VDB pane as highlighted (in red) in the image below. Click open the Advanced tab to add a new Data role.
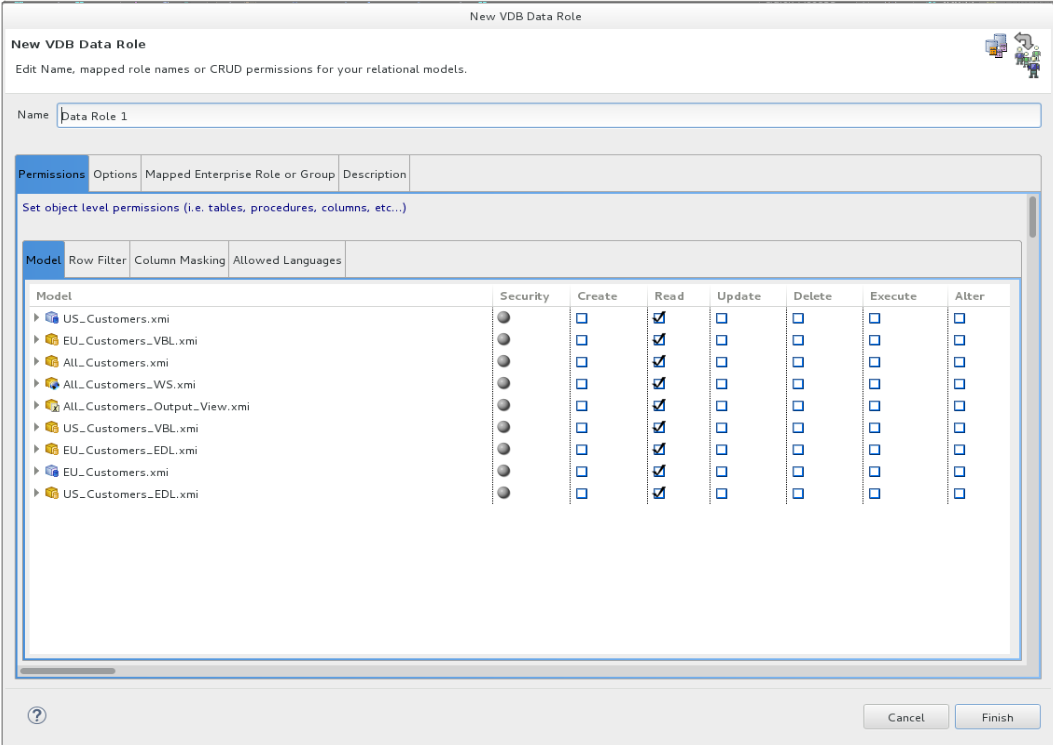
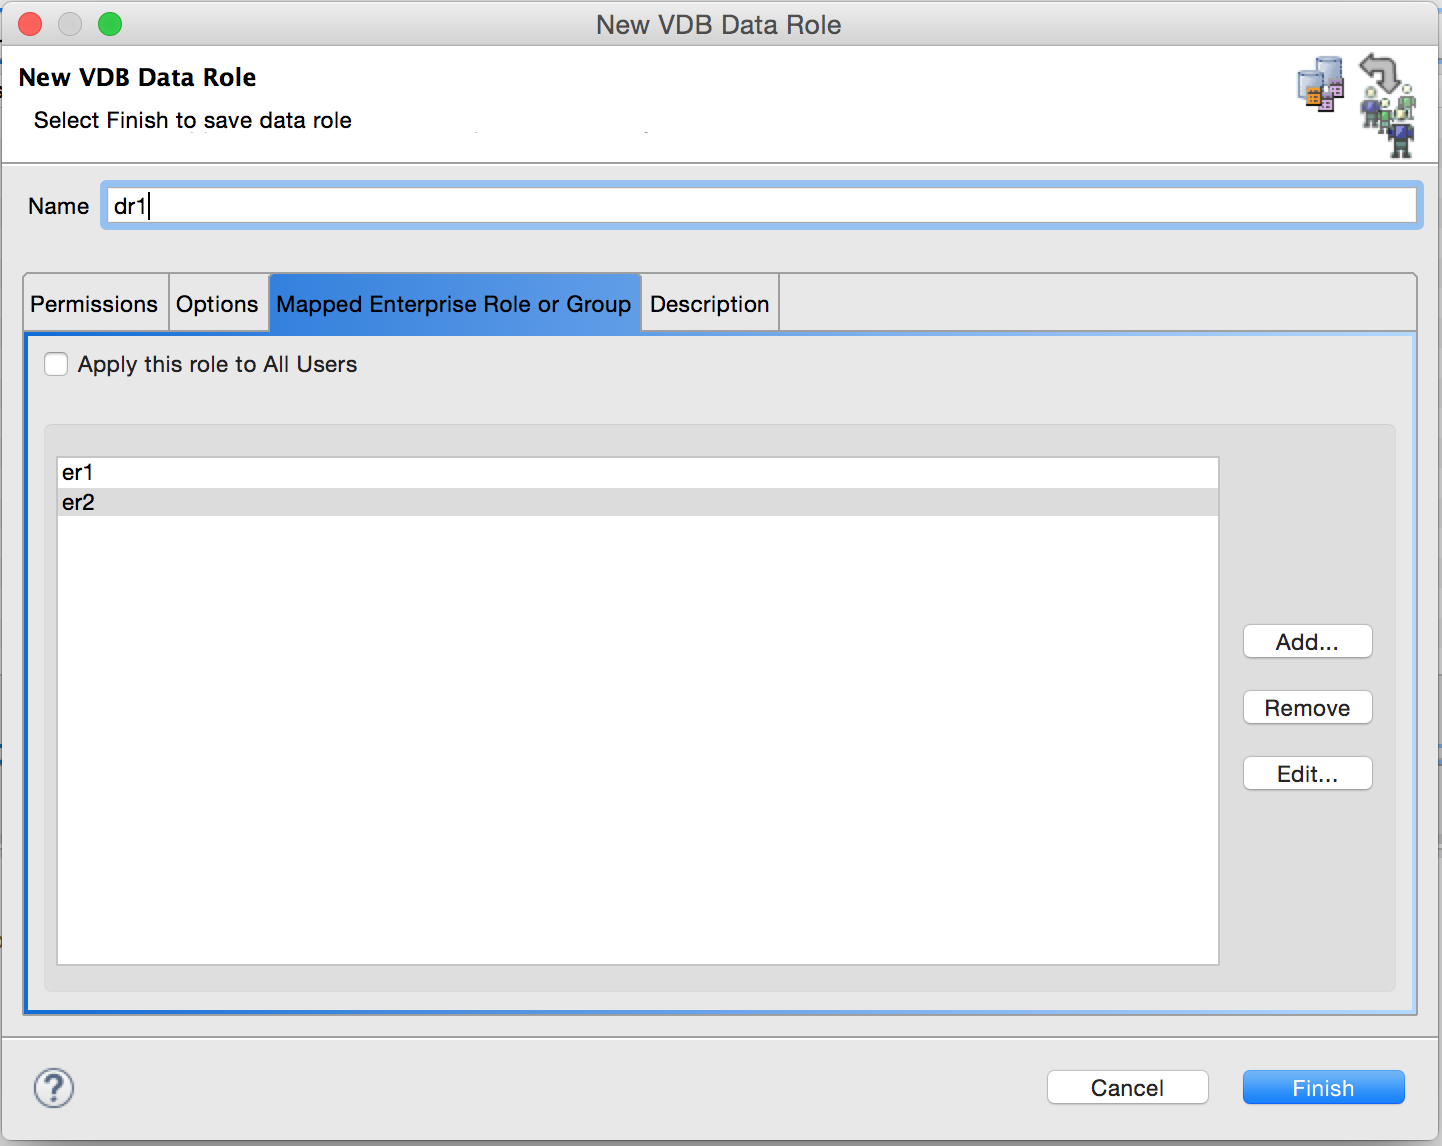
In the advanced tab, click on the highlighted icon to add a new data role. A window should pop-up just as shown below.
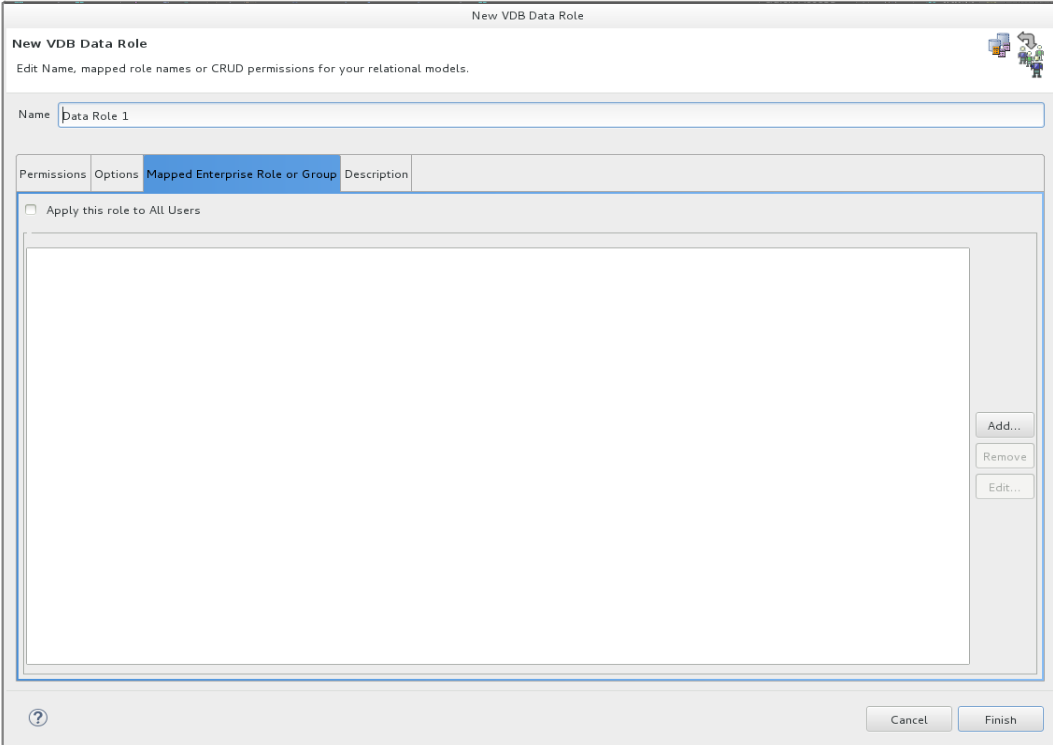
Note the tab Mapped Enterprise Role or Group tab in image below. In the next section we will define an Enterprise role and how a Data Role maps to one or more Enterprise roles.
Data Roles vs Enterprise Roles and their mapping
JBoss Data Virtualization runtime engine runs on top of the JBoss EAP (Enterprise Application Platform) platform and as such the security (authentication and authorization) around the VDBs is delegated to the container (EAP) as the container can handle security domains based on wide variety of login modules. The role assigned to a login after authentication by EAP is called the Enterprise Role.
As shown in the image below, user john.doe when tries to access an object in a secured VDB, his login is authenticated against the configured security-domain and his login is given an enterprise role er1.
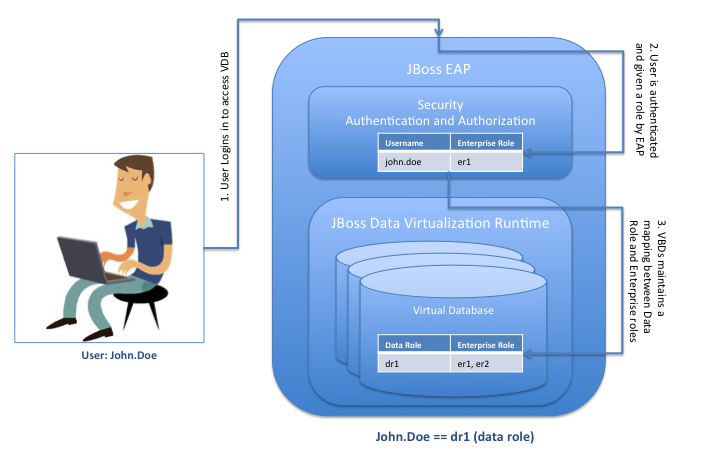
Post authentication, when the access request is then received by the Data Virtualization engine, it tries to then figure out to what data role the enterprise role er1 is mapped to and then associates the correct set of permissions to the access request accordingly.
The role-mapping for the above-mentioned scenario should look like the image below:
Key things to remember about role-mapping
-
It is possible for a user to have any number of container roles, which in turn imply a subset of JBoss Data Virtualization data roles
-
Each applicable JBoss Data Virtualization data role contributes cumulatively to the permissions of the user
-
No one role supersedes or negates the permissions of the other data roles
-
If there are one or more data roles defined in a VDB, ideally one of the roles should apply to all users. In the absence of such a role, any authenticated user that does not have a corresponding data role would be locked out from doing even (most often harmless) selects on the exposed models
Permissions
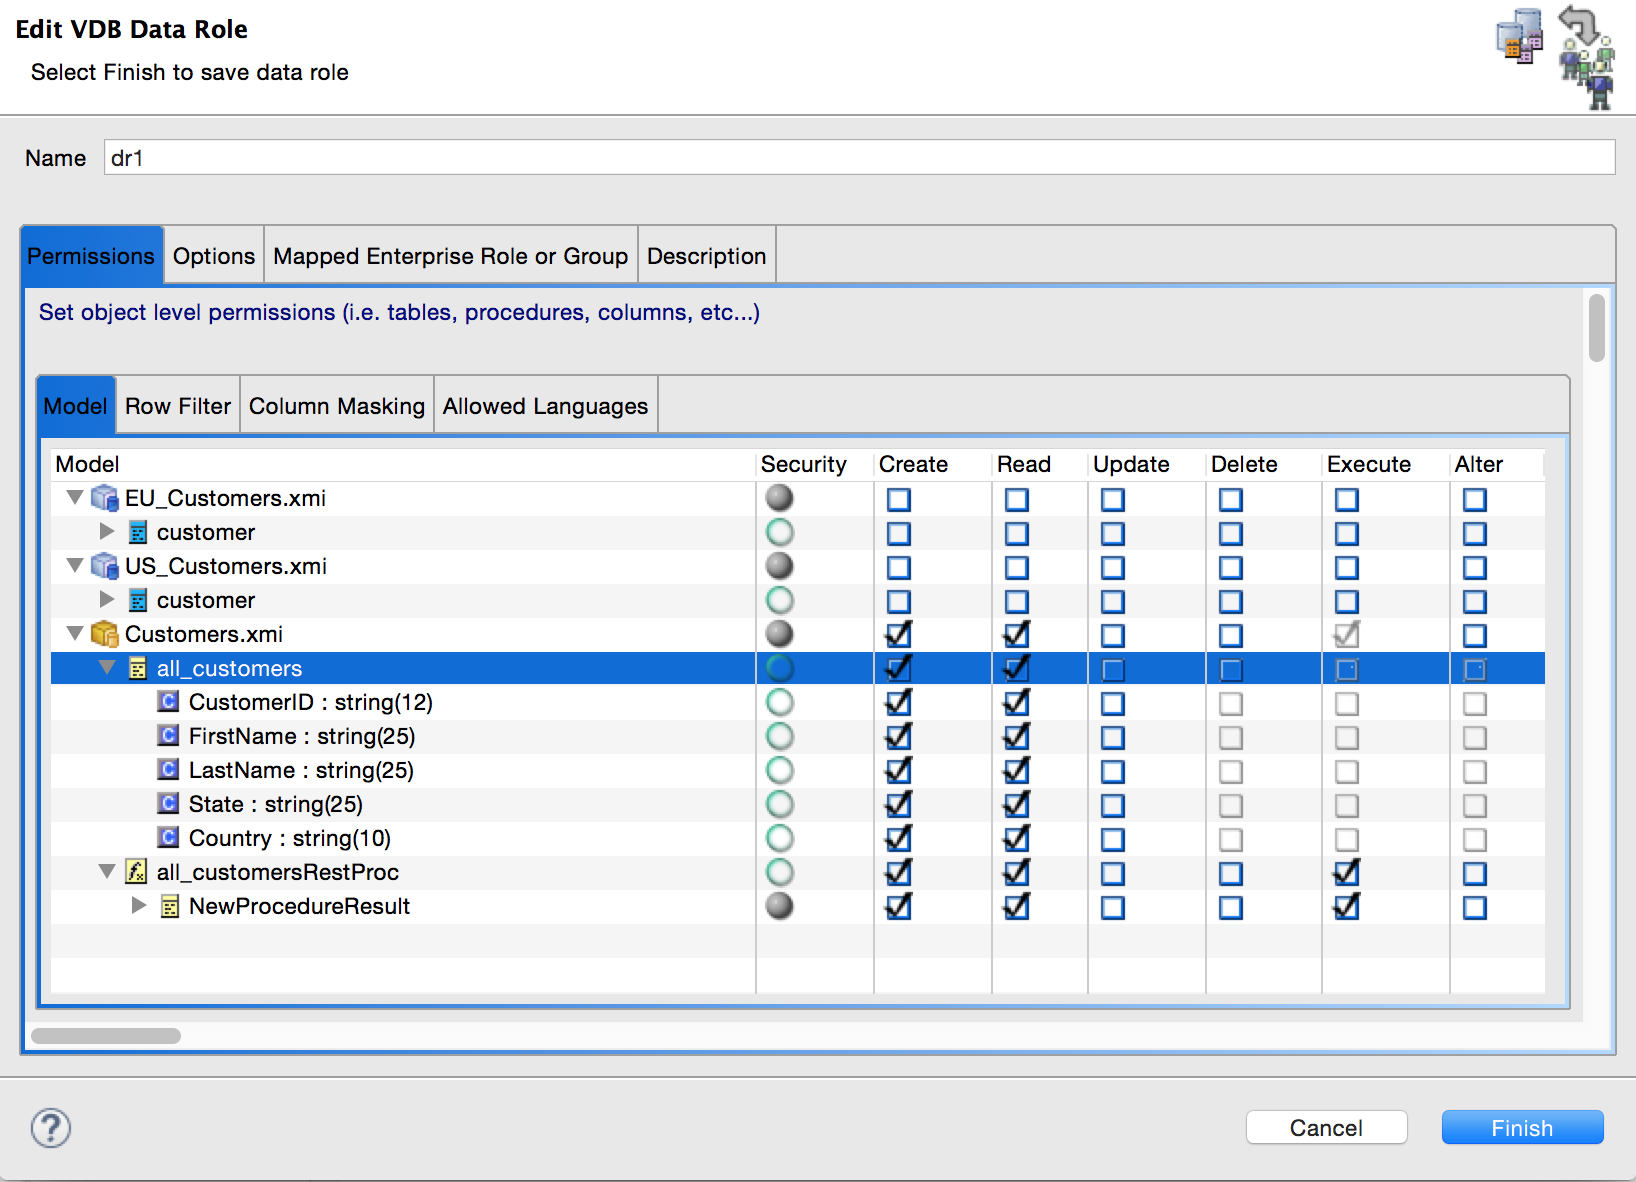
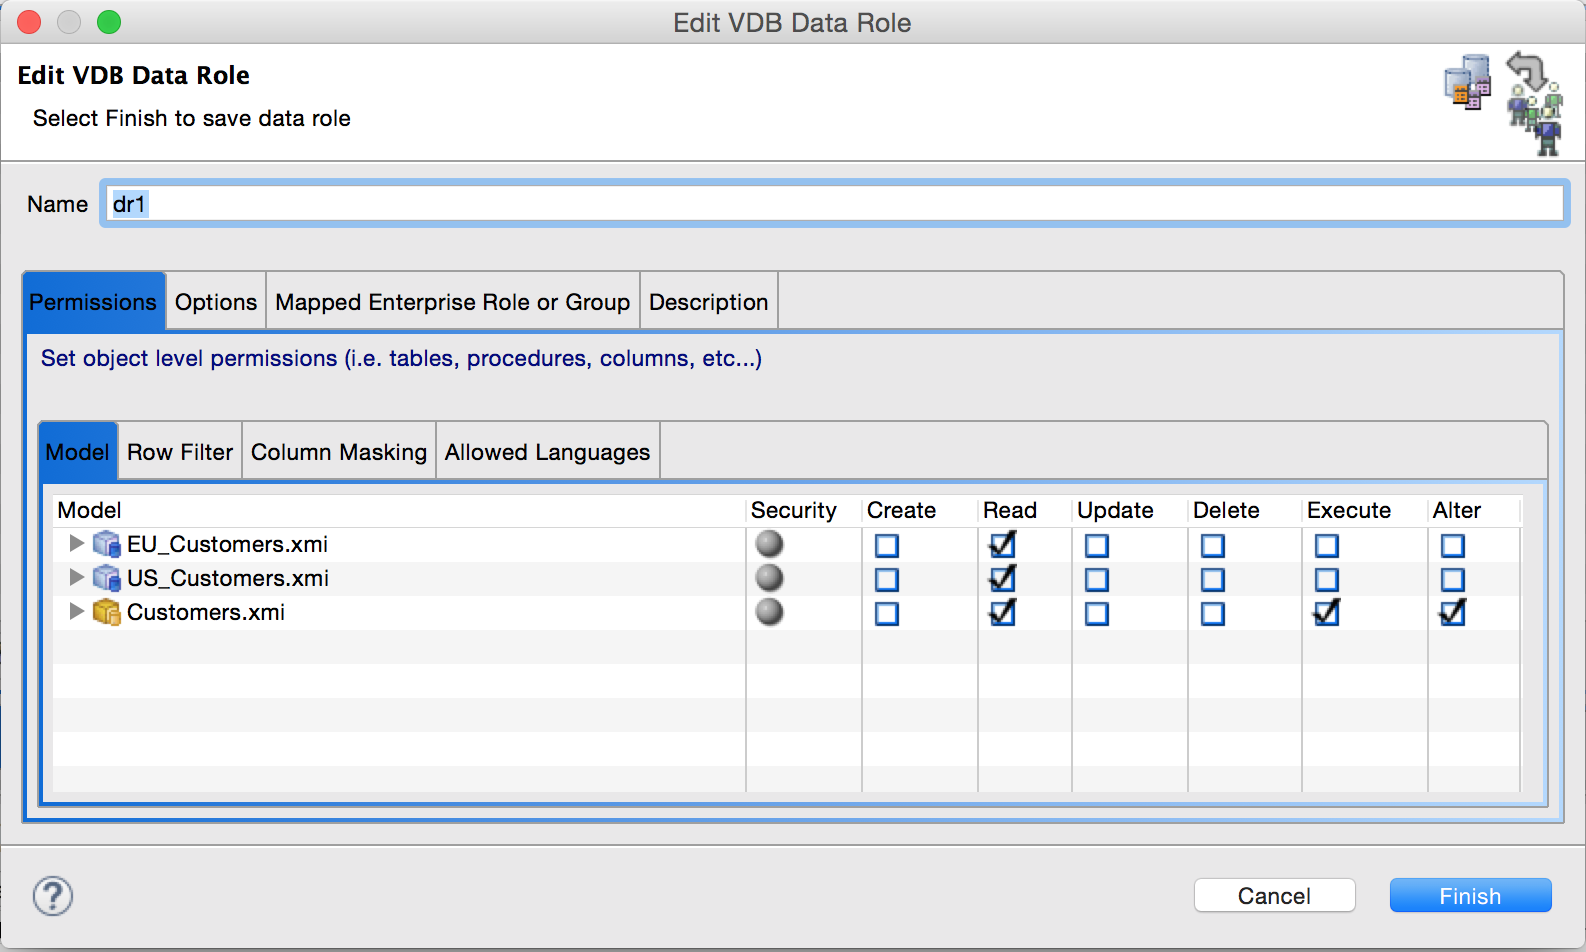
When creating a Data Role, one can also define permissions on the various objects exposed by the VDB to as much granular level as desired. CRUD permissions can be defined at various levels, as shown below (in the order of less granular to more granular)
-
Model (source or view)
-
Under each Model: Table/View, Procedure, Function
-
Under each table/view, procedure, function: Columns, Result Sets etc.
As a general rule, for giving permission, start from the top in the order shown above and when restricting, start from bottom on permitted objects.*
This is because a data role cannot have a READ permission on a table without implicitly having a READ permission on the model to which the table belongs.
This is llustrated with permissions for the dr1 data role on various objects (and it children, recursively) as shown below.
The exhaustive list of permissions, to which specific database objects they apply to and under what condition is covered in detail here and is not worth duplicating in the article.
Few additional yet important details about Permissions
-
Hidden models are accessible by user queries. One way to restrict their access is to create a data role, apply it to all users (in the Mapped Enterprise Role or Group tab) and uncheck the READ permission at the model level
-
Doing a "select " on a table whose one or more columns have been restricted will result in an error. What will however succeed is a *SELECT on all the individual columns the user has access to on the given table
-
With the CRUD permissions apparent on database objects. The ALTER permission deserves a bit more explanation. The ALTER permission lets the user run the ALTER VIEW or ALTER PROCEDURE command, thereby changing (only) the transformation query behind the view/procedure. Since the projected symbols cannot be changed, the new transformation query must conform projected symbols of the view/procedure otherwise the ALTER command will fail.
-
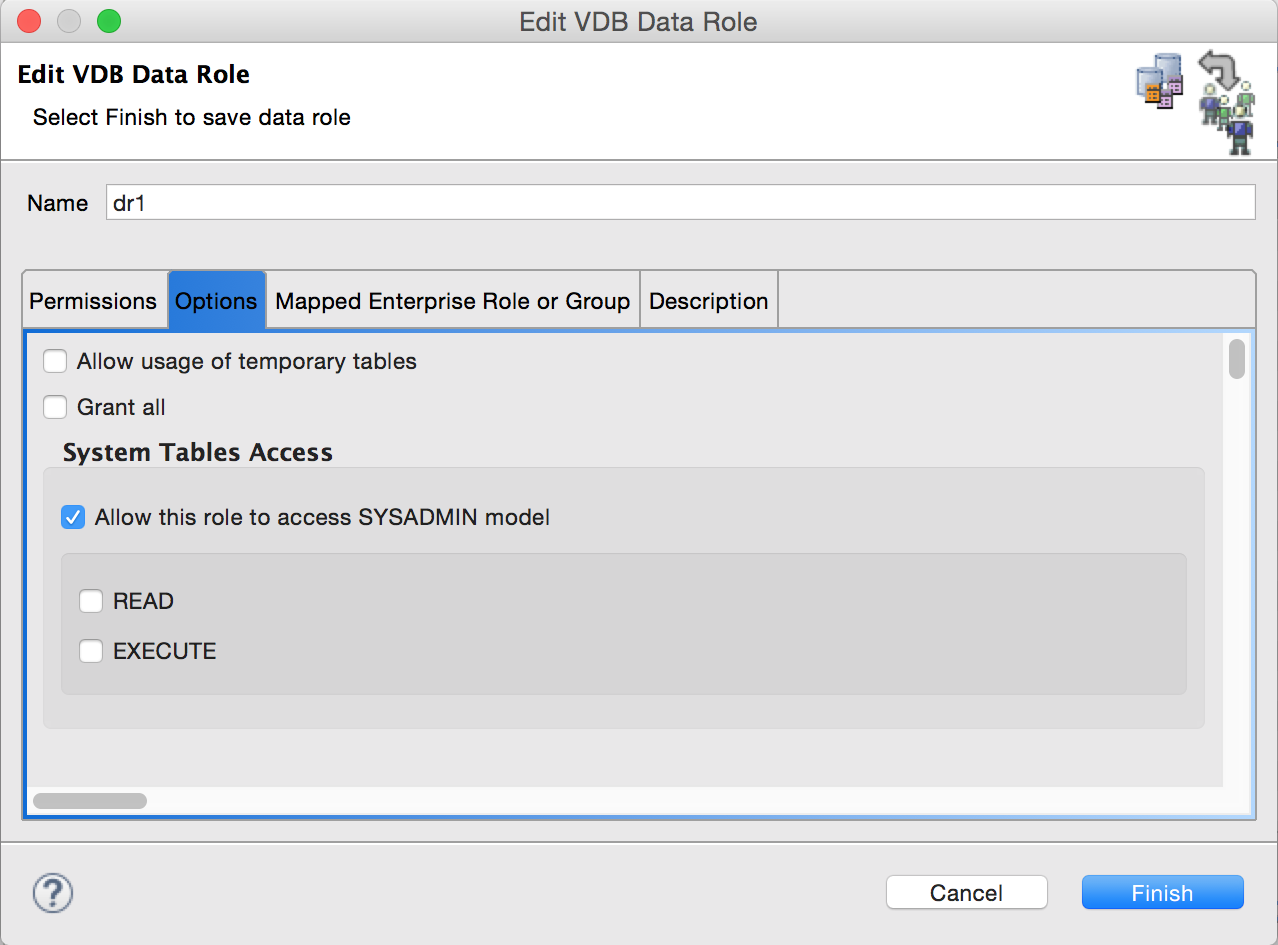
From documentation: Permissions are not applicable to the SYS and pg_catalog schemas. These metadata reporting schemas are always accessible regardless of the user. The SYSADMIN schema, however, may need permissions as applicable. The permissions on SYSADMIN schema can be controlled via the Options tab of a defined data role as shown below.
Demo
We will use the Financials VDB environment to illustrate how row filtering or column masking works.
The demo environment consists of :
-
MySQL source Model: US_Customers with a single source table customer holding 17 US customer records
-
MySQL Source Model: EU_Customers with a single source table customer holding 18 European Union customer records
-
A View Model: Customers with a single view table all_customer that is essentially a union of the above two source tables
-
The all_customers view table has the following columns
-
CustomerID
-
FirstName
-
LastName
-
State
-
Country
-
The Country column for US Customers is ‘United States’
-
Row Filtering
To illustrate row filtering, we would (re)use the dr1 data role and add the row filter to Customers.all_customers table to filter out the rows where the Country is NOT USA
Open up the VDB, go to the Advanced tab, choose the first Data Roles tab and double-click-open the dr1 data role. One would see a pop-up similar to the one shown below
Click on the Row Filter tab of the inner tabbed pane and click on the Add button to add a new row filter
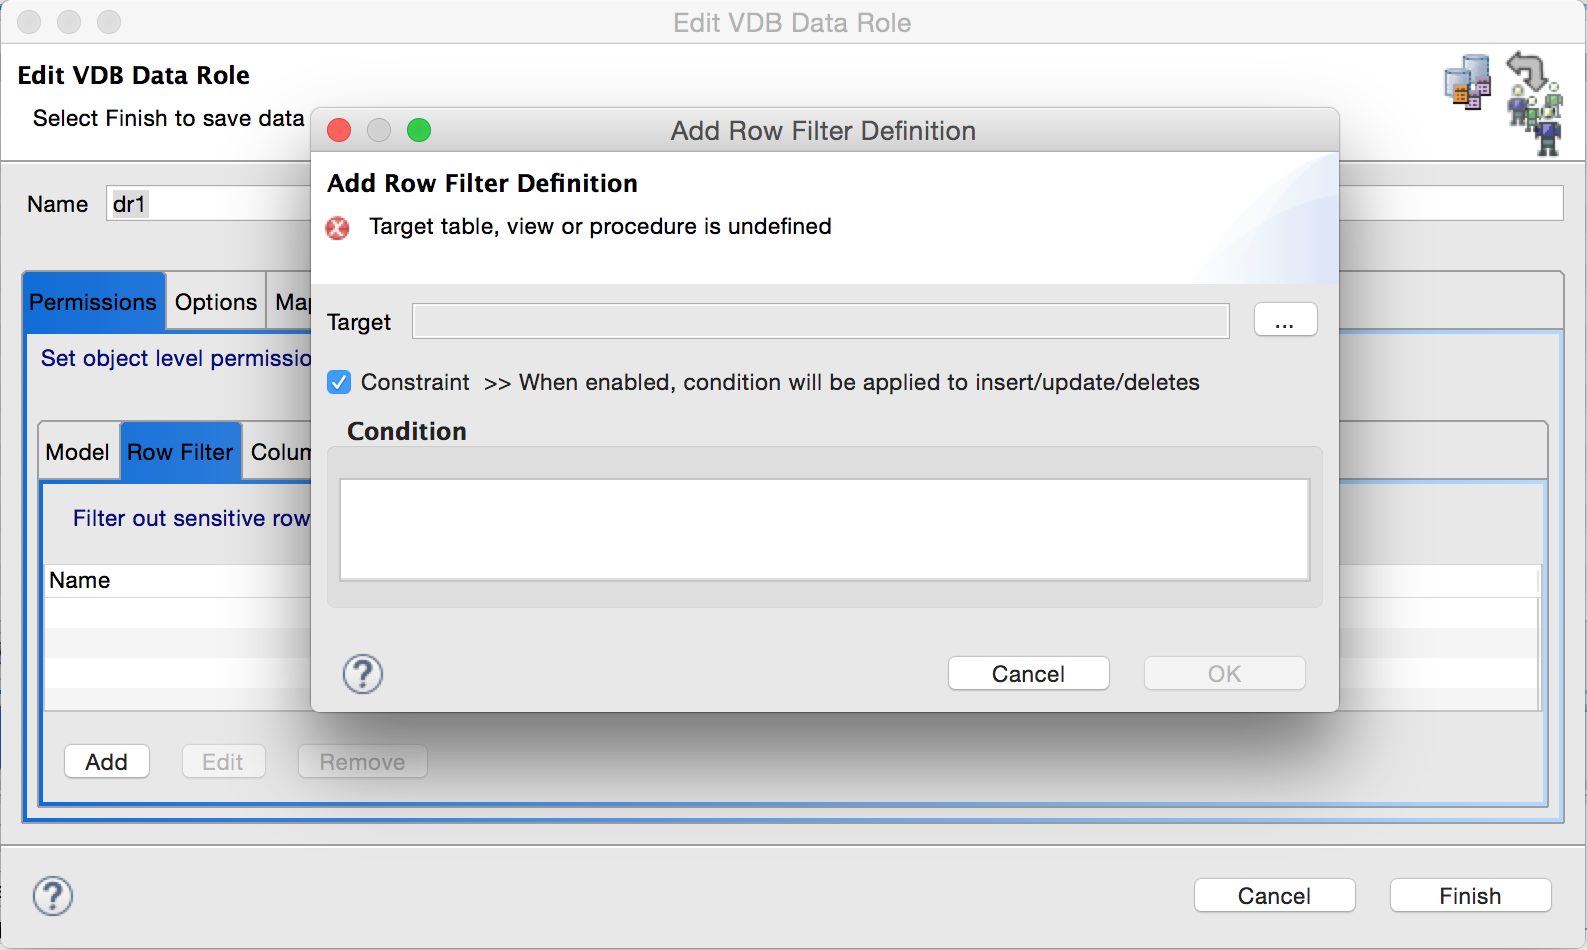
Click on the button with ellipsis next to the target box and choose the desired table/view on which the row filter has to be applied.
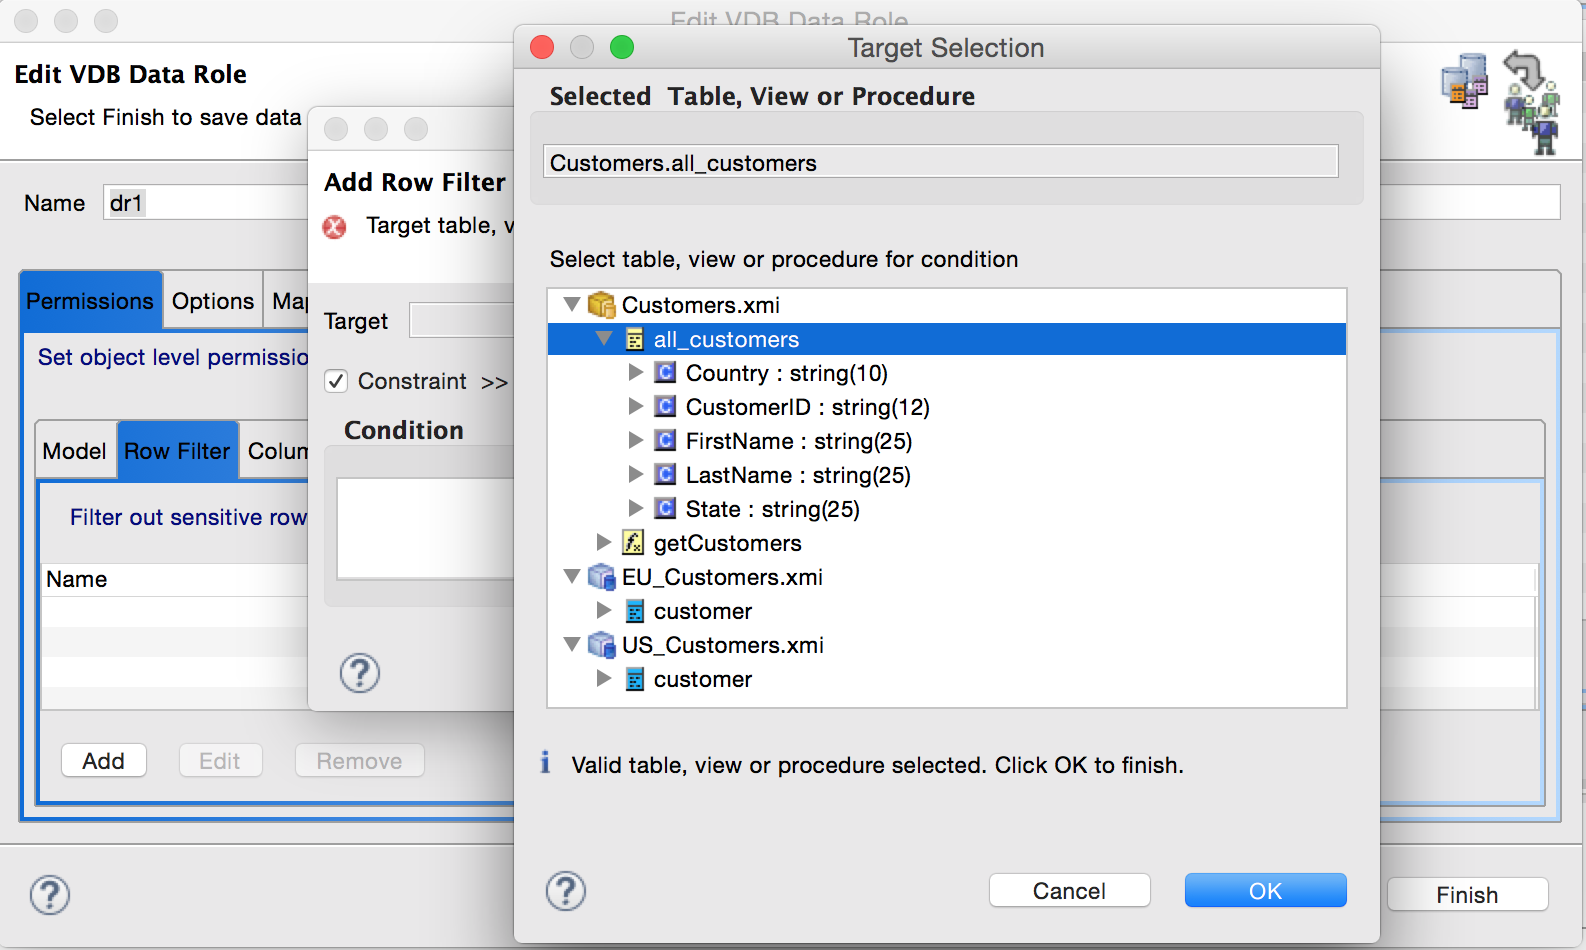
Click OK to return to previous window. Now in the Condition text box put in the desired condition. For this example we will choose Country = ‘USA’
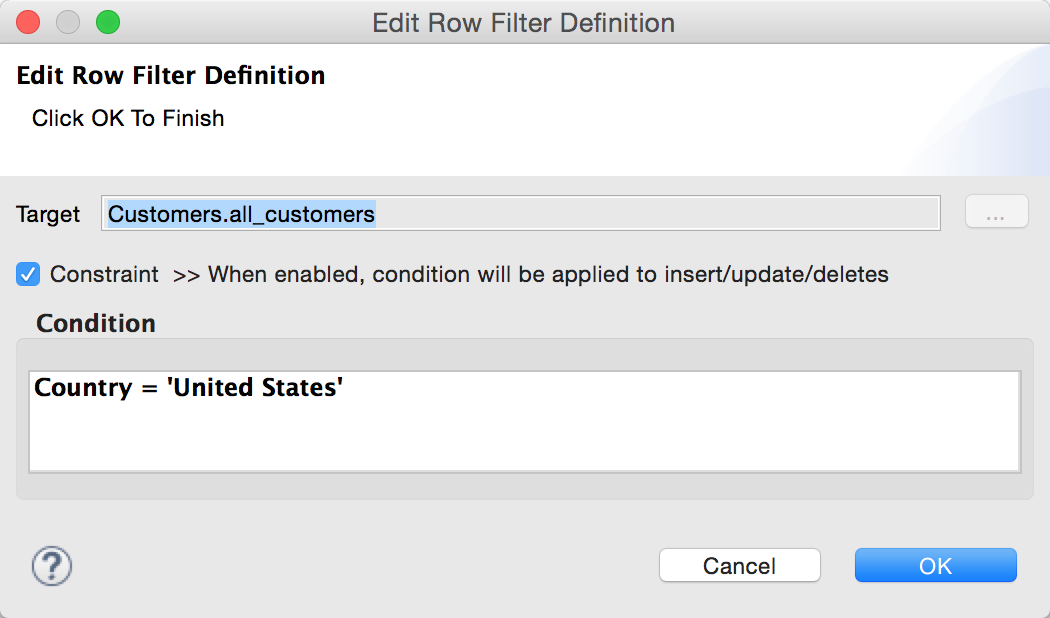
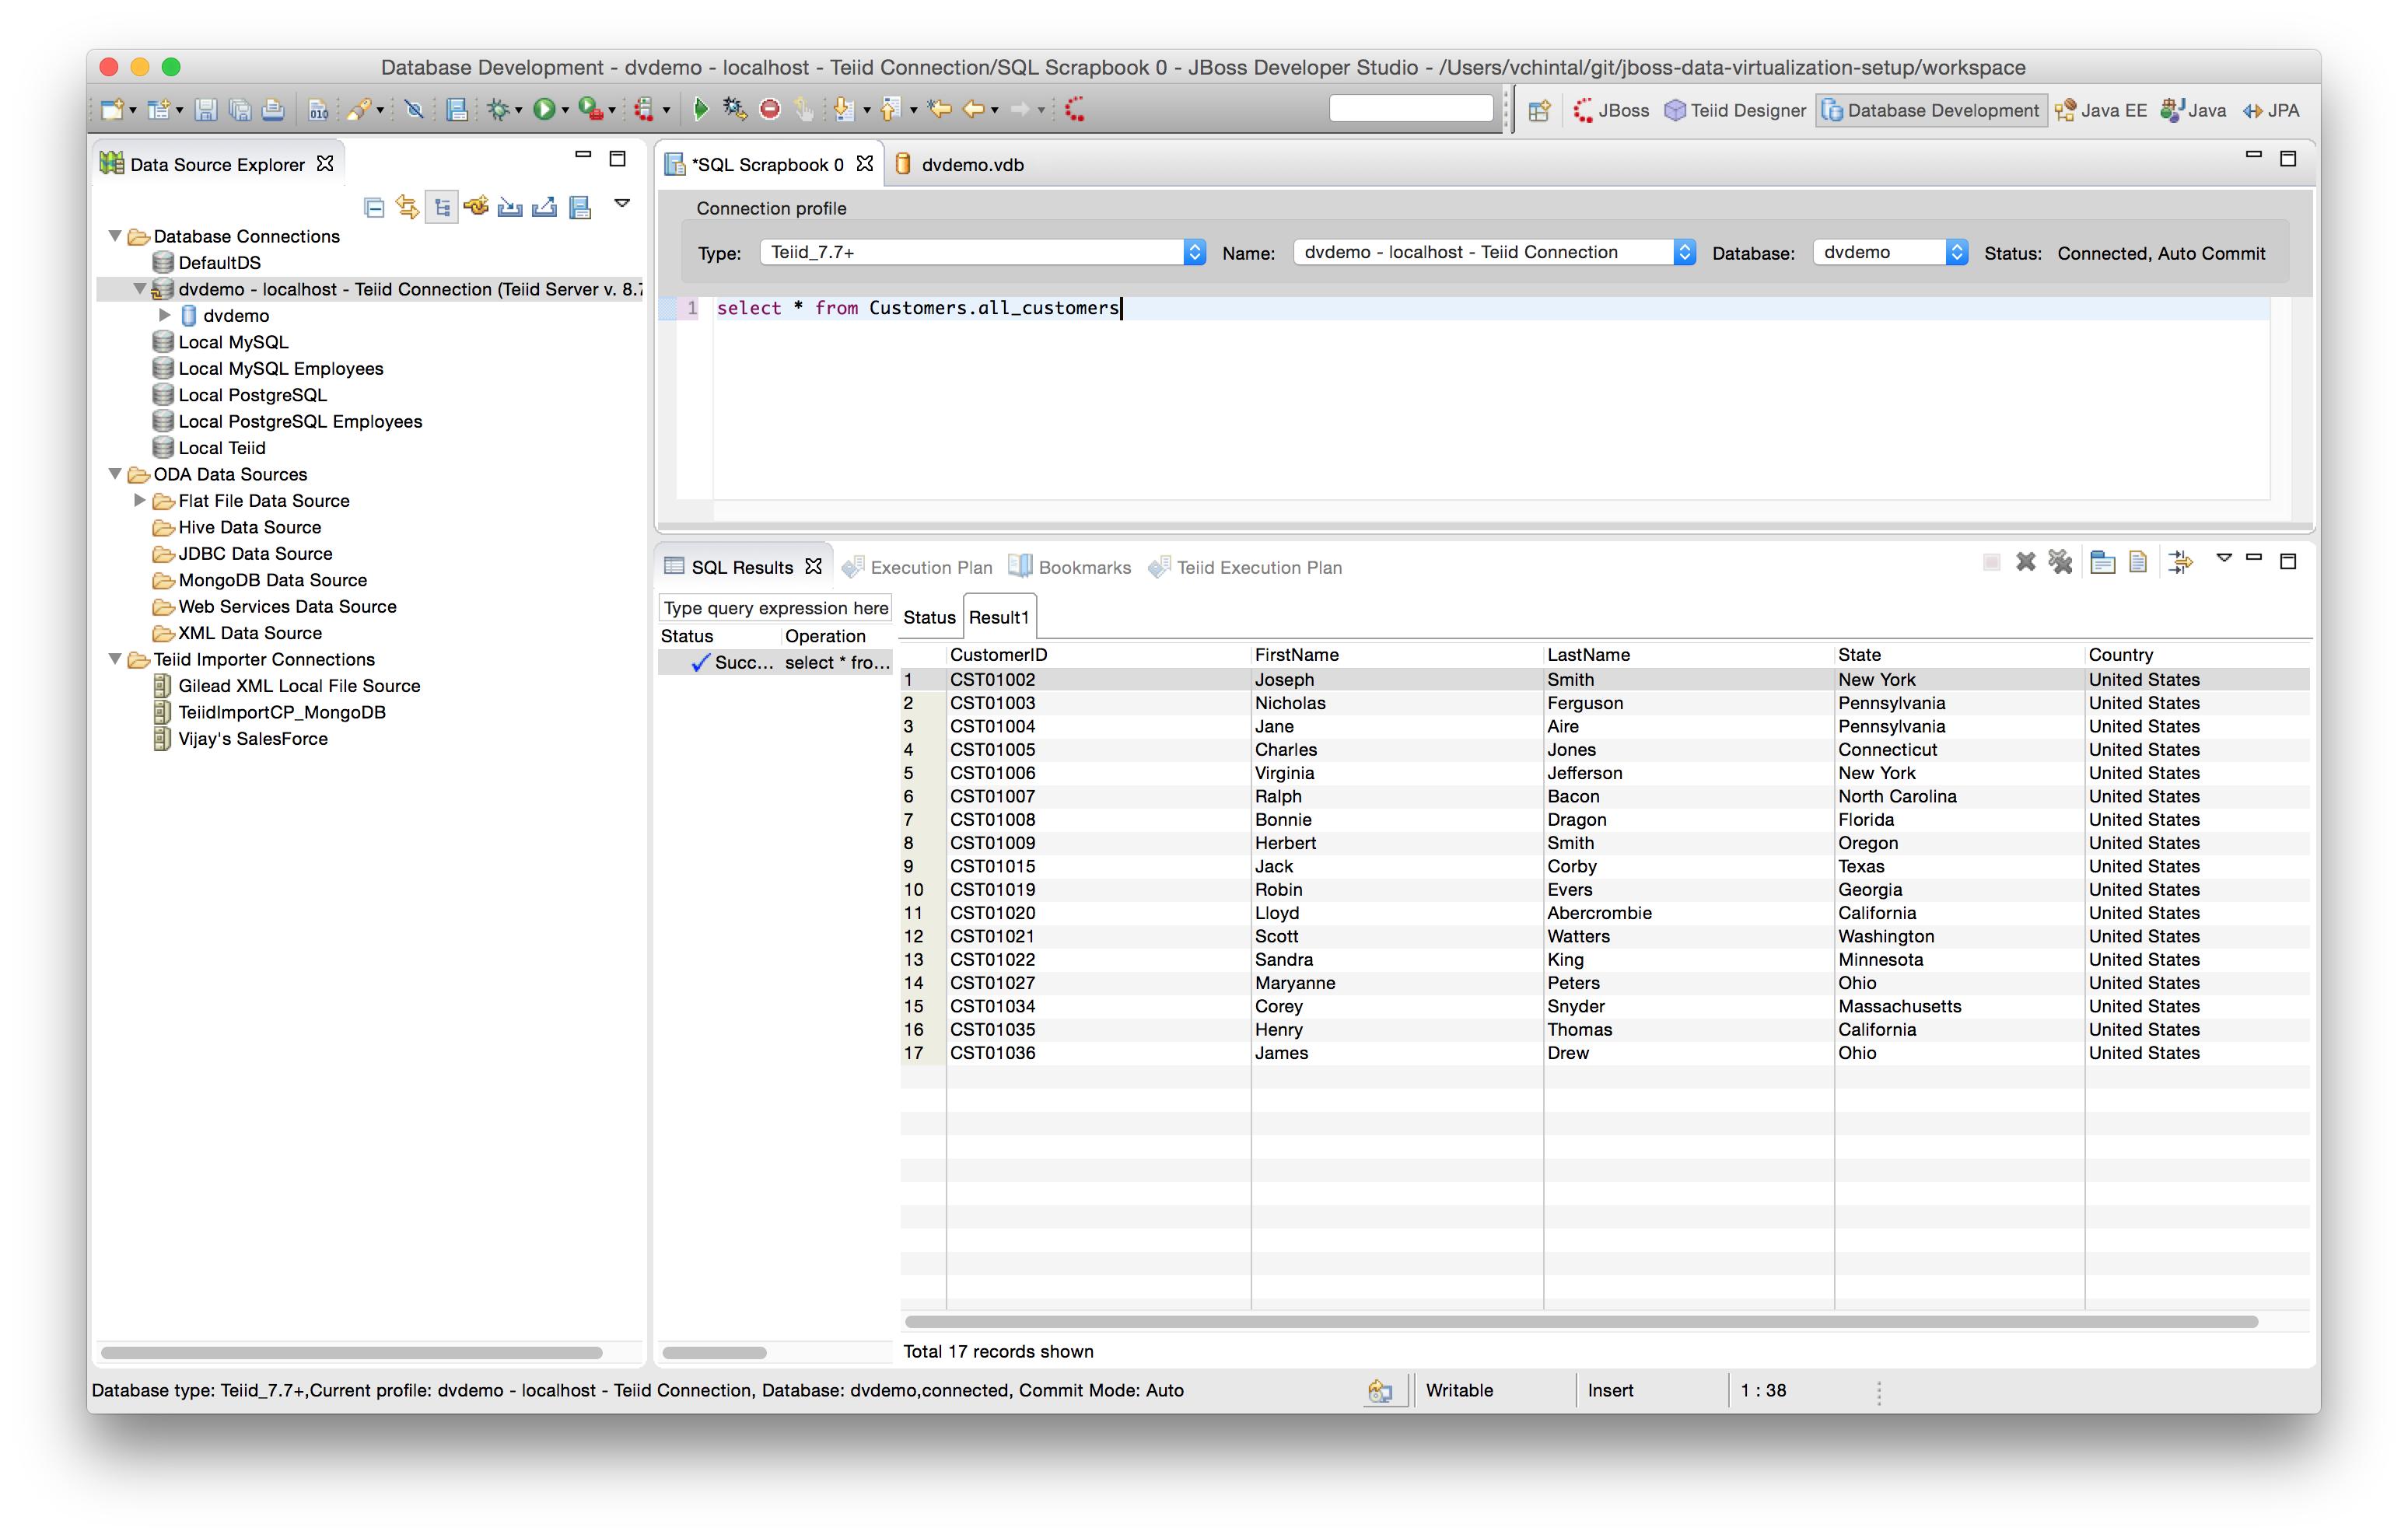
Click on OK in the Edit Row Filter Definition, then click on Finish on the Edit VDB Data Role popup and save the VDB. When the following query is run on the deployed VDB, provided the login user is mapped to the dr1 data role, then the number of records that are returned should be limited to 17 instead of 35.
select * from Customers.all_customers
For Further Reading: Important Considerations for Row Filtering
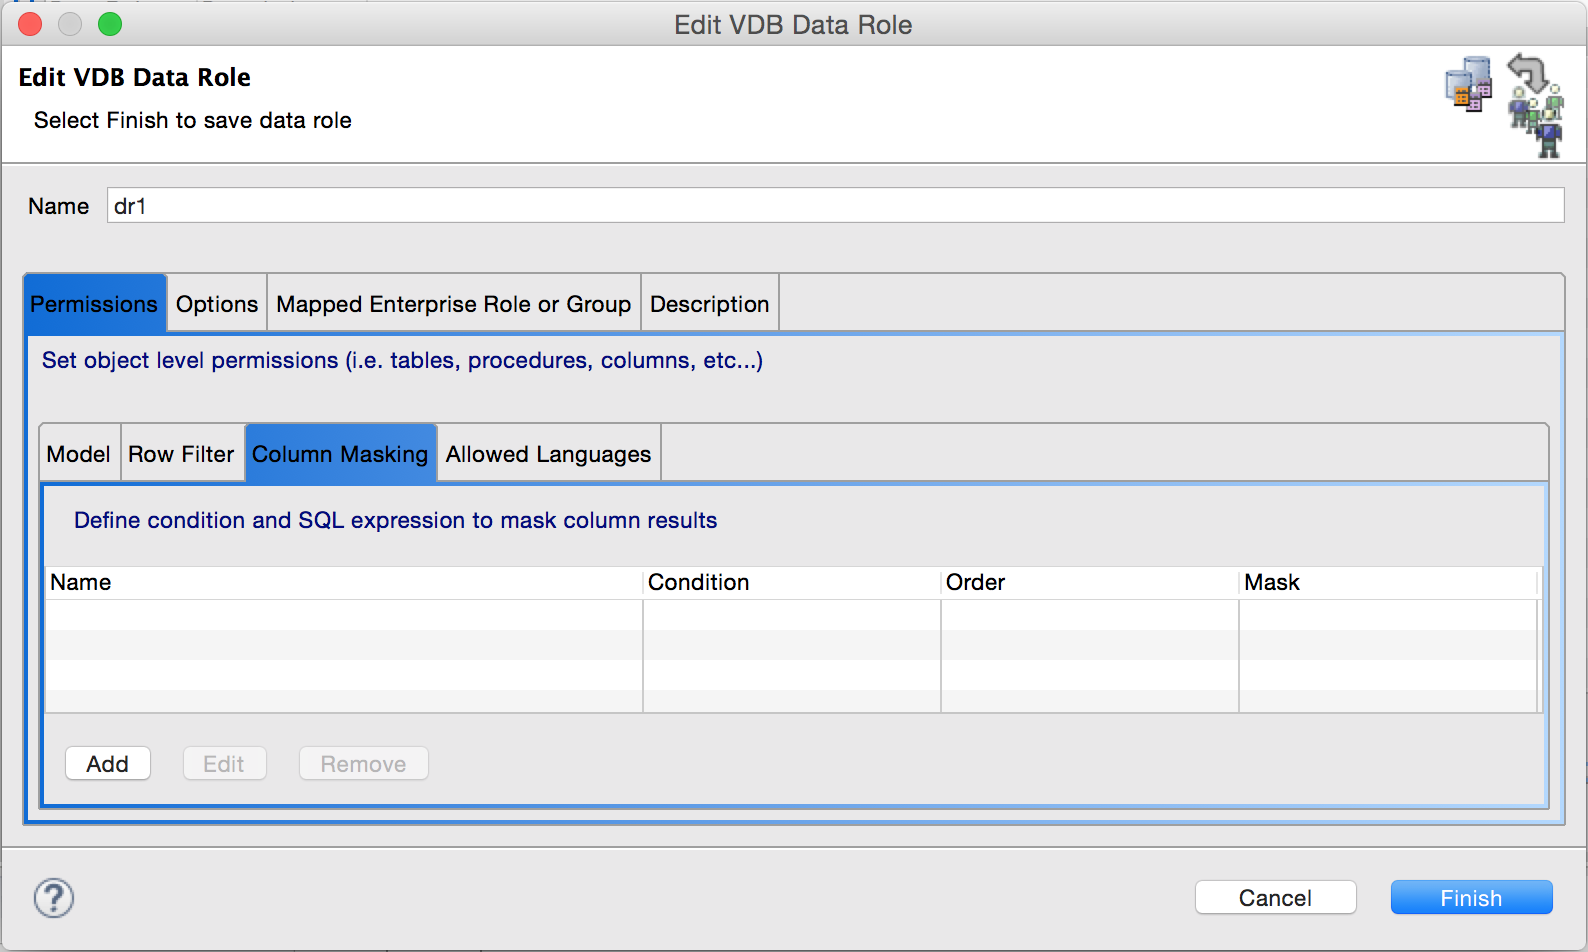
Column Masking
To illustrate column masking, we would (re)use the dr1 data role and add a column mask to Customers.all_customers.CustomerID field such that only the last four characters of the field are displayed AND on a condition that there are more at least 4 or more characters in the field, otherwise display the field as is.
Edit the dr1 data role as shown as the first step in [Row Filtering] (#row-filtering).
Click on the Column Masking tab of the inner tabbed pane and click on the Add button to add a new column mask.
Click on the button with ellipsis next to the Target Column box of the Add Column Mask pop-up and select the target column in the Target Selection pop-up. Both the popups are shown in one image below for convenience.

Click OK on the Target Selection pop-up and return to Add Column Mask pop-up. Fill in the condition and Column Expression as shown below.
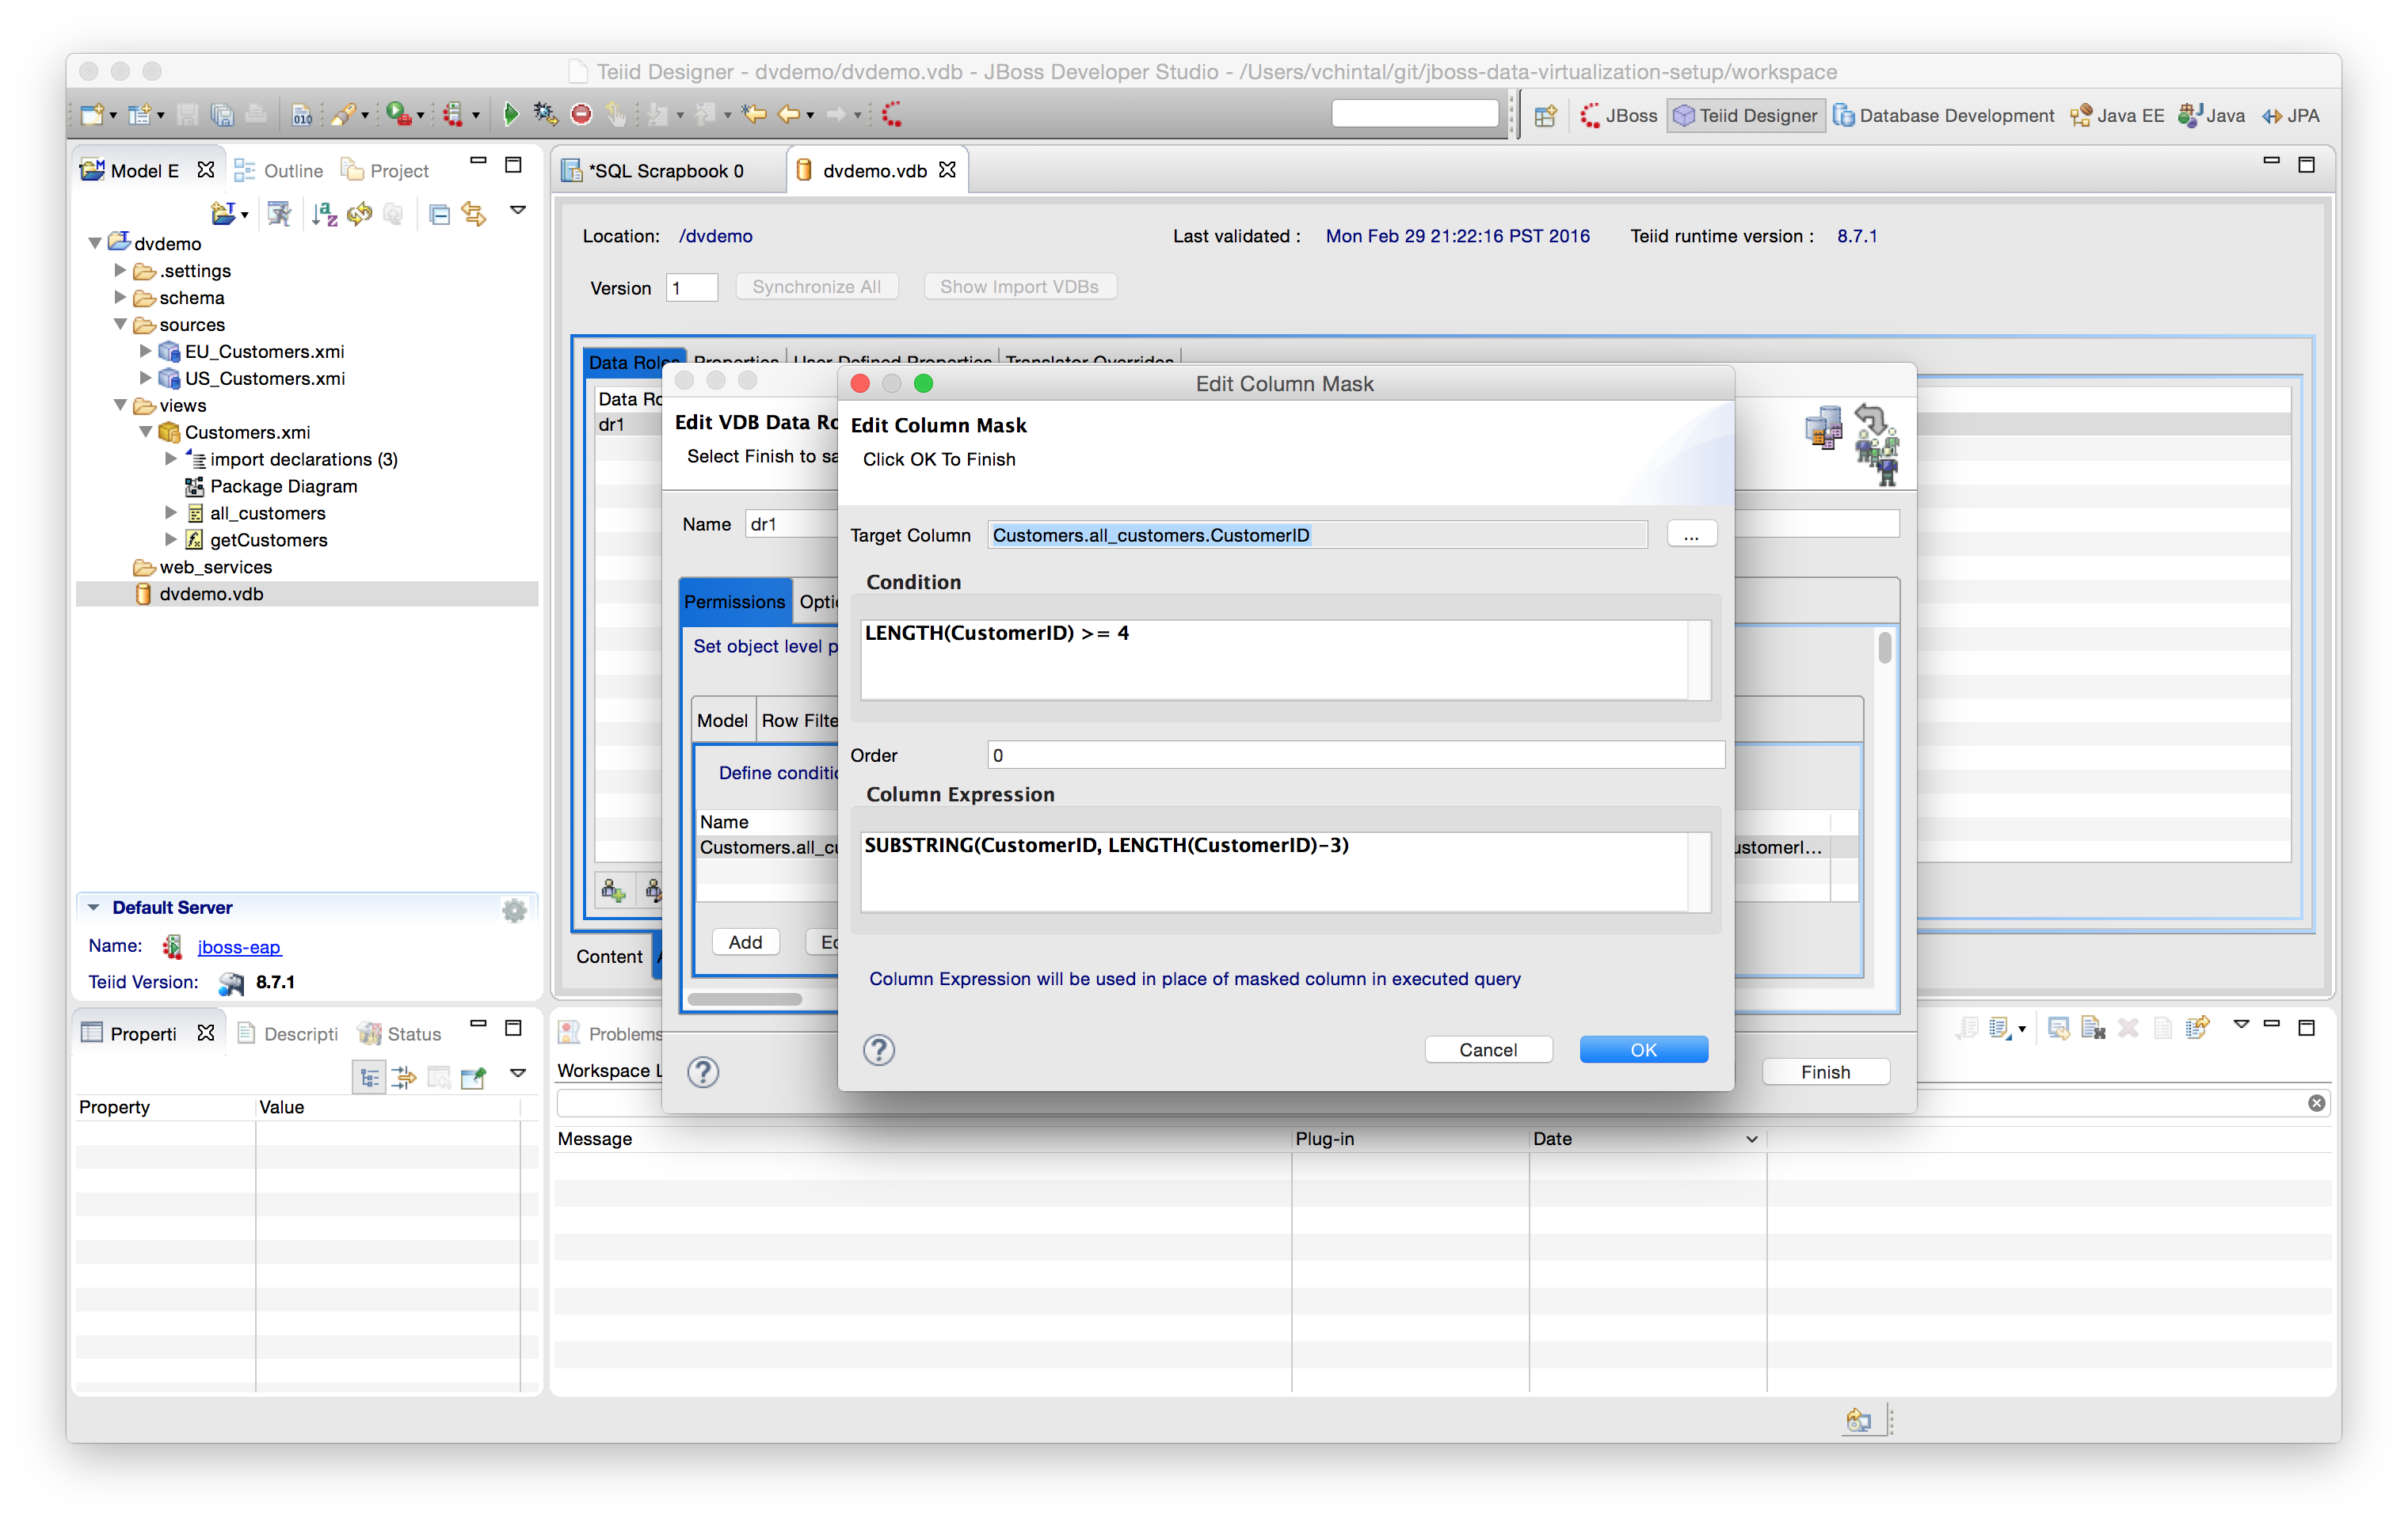
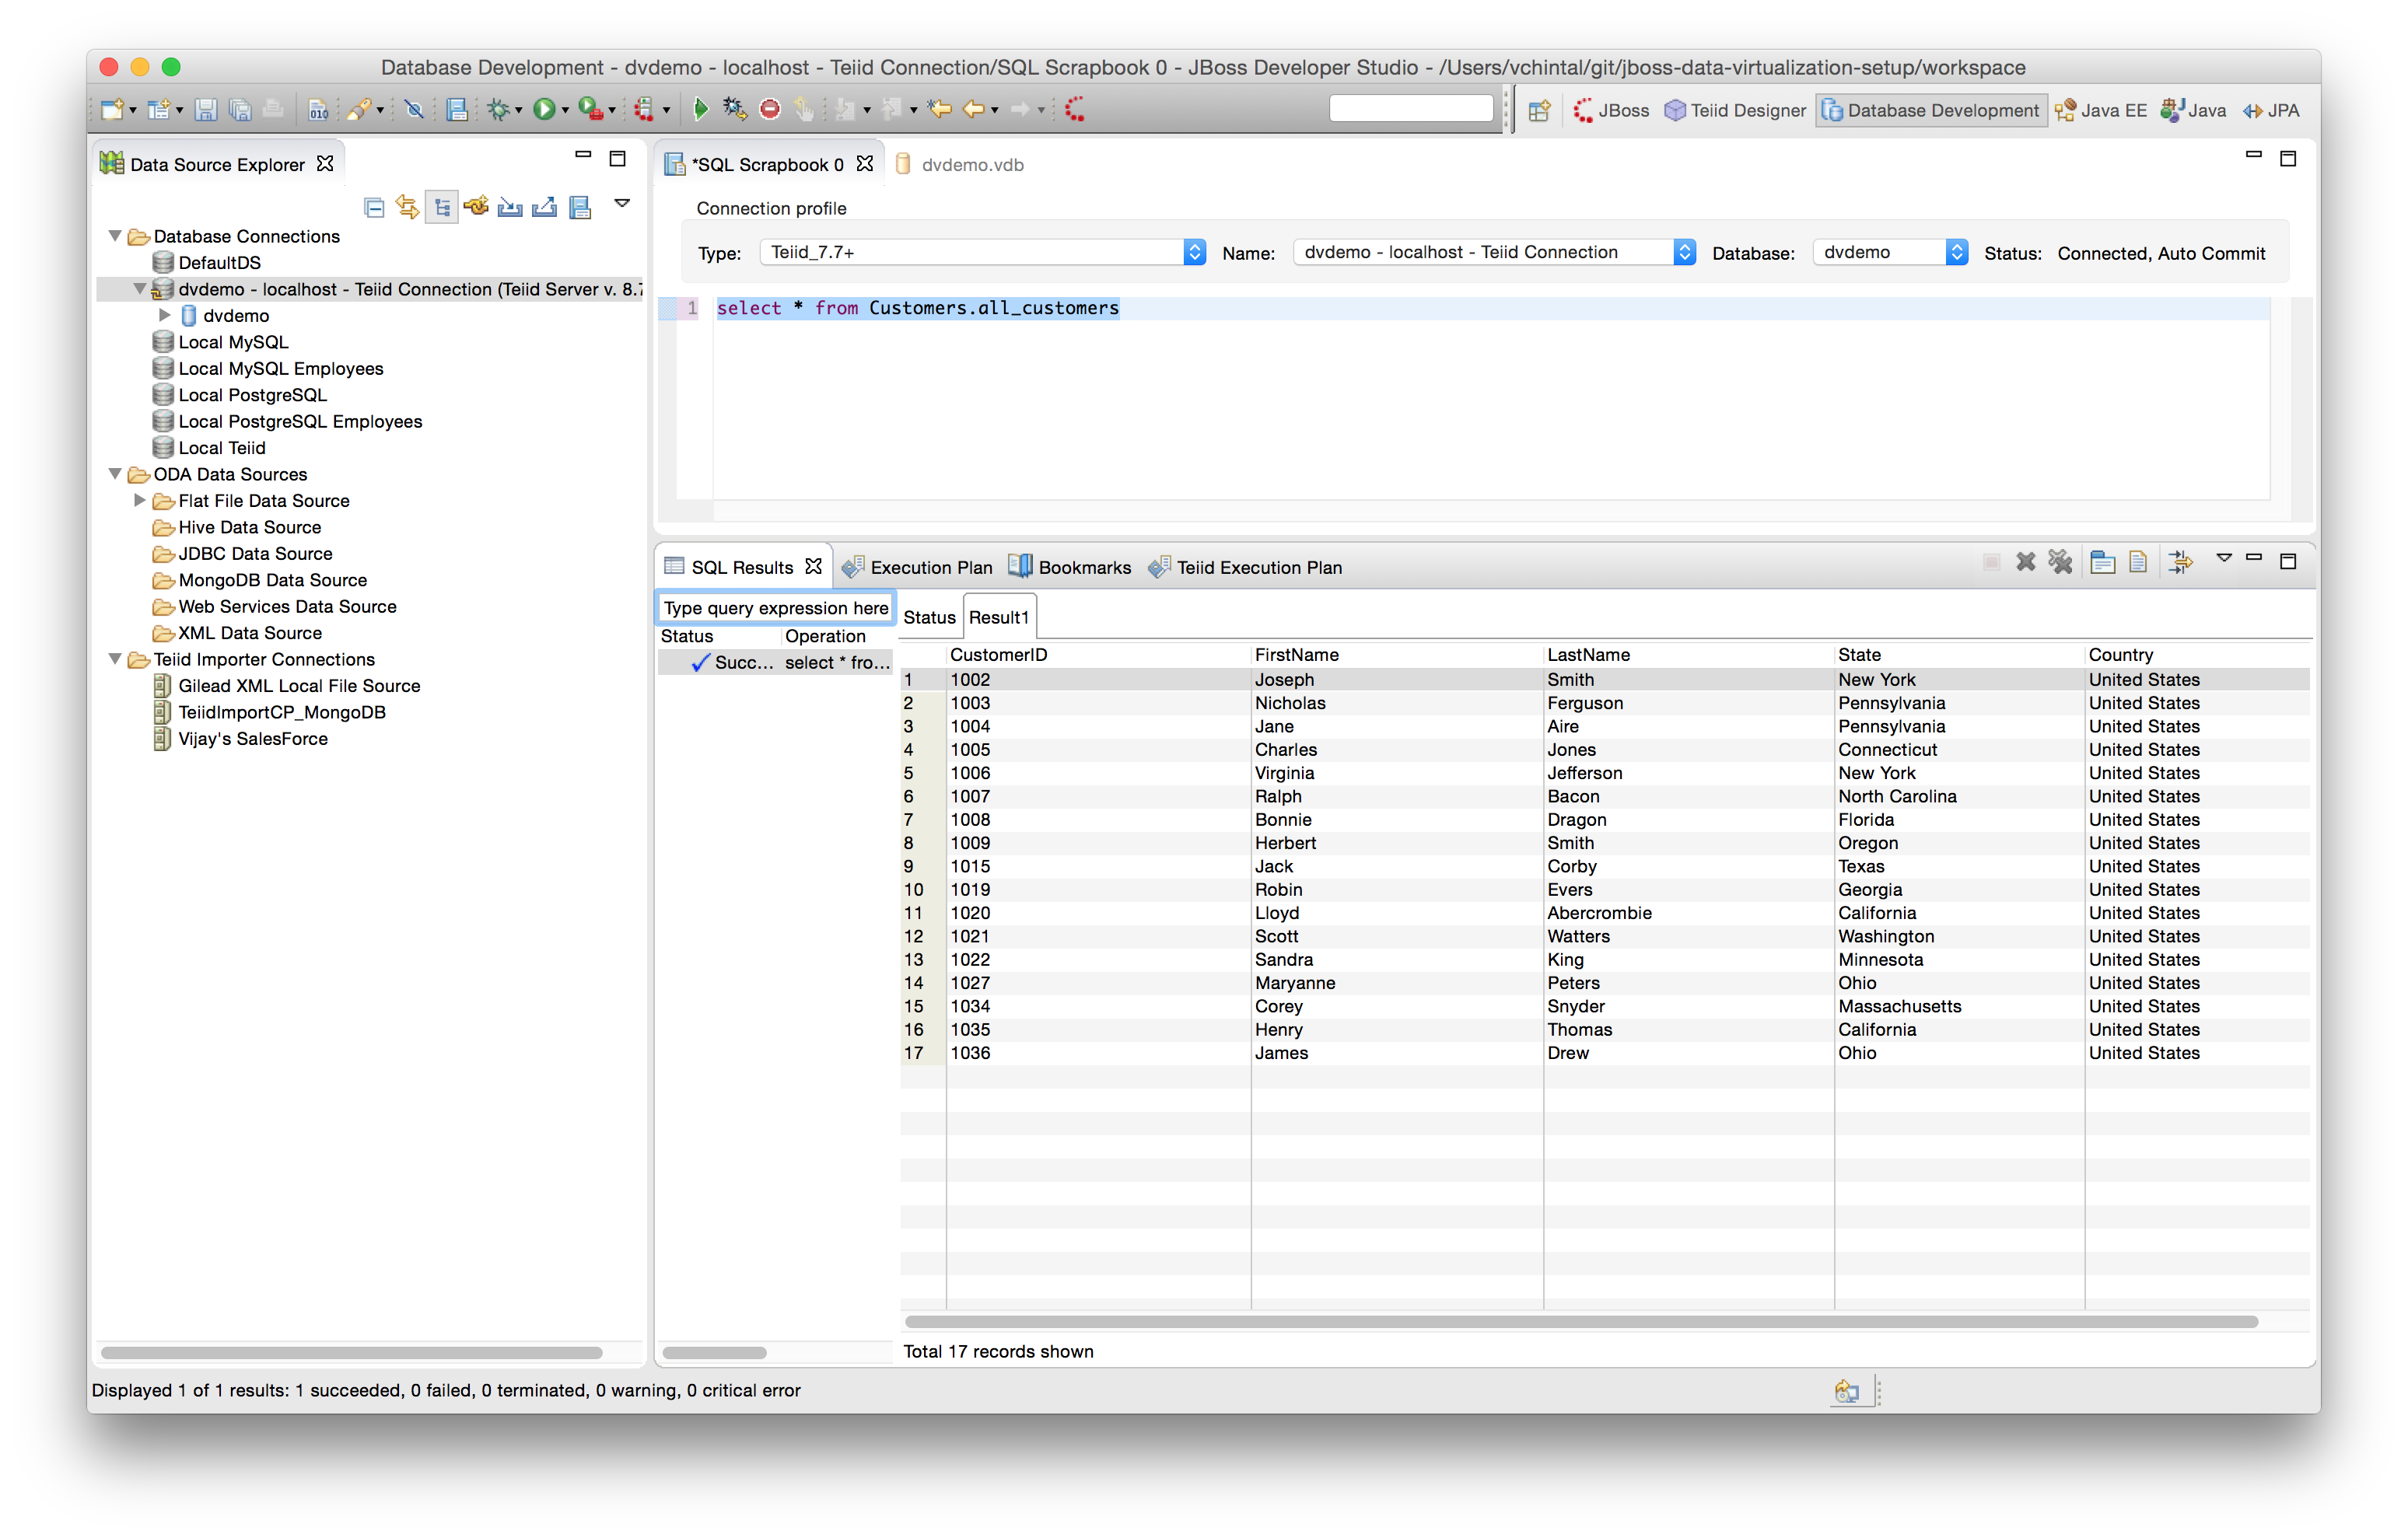
Click on OK in the Edit Column Mask pop-up, then click on Finish on the Edit VDB Data Role popup and save the VDB. When the following query is run on the deployed VDB, provided the login user is mapped to the dr1 data role, then the CustomerID column will display only the last 4 chars as shown below.
select * from Customers.all_customers
For Further Reading: Important Considerations for Column Masking